RD Ceramics
  • Home
  • Shop
    • Wholesale
  • Events
  • Classes
  • About
    • Wheel Talk Podcast
    • Products I Use
    • Blog
  • Contact

Building your own mug shelf on the cheap

5/8/2019

Comments

 
Picture
Picture

Picture
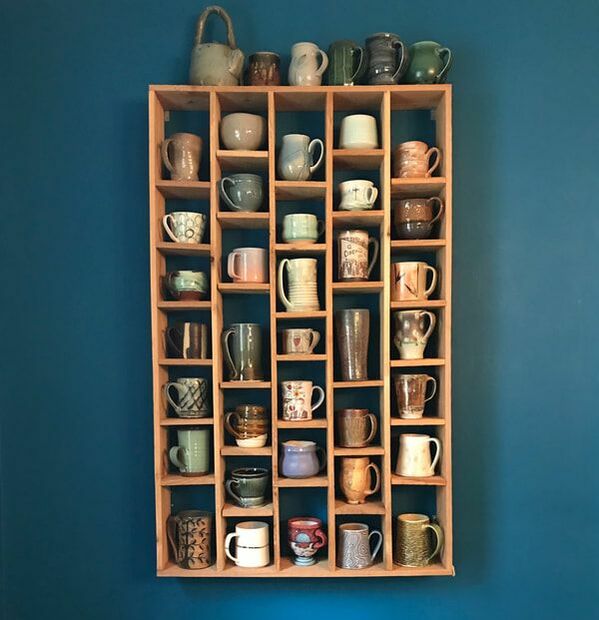
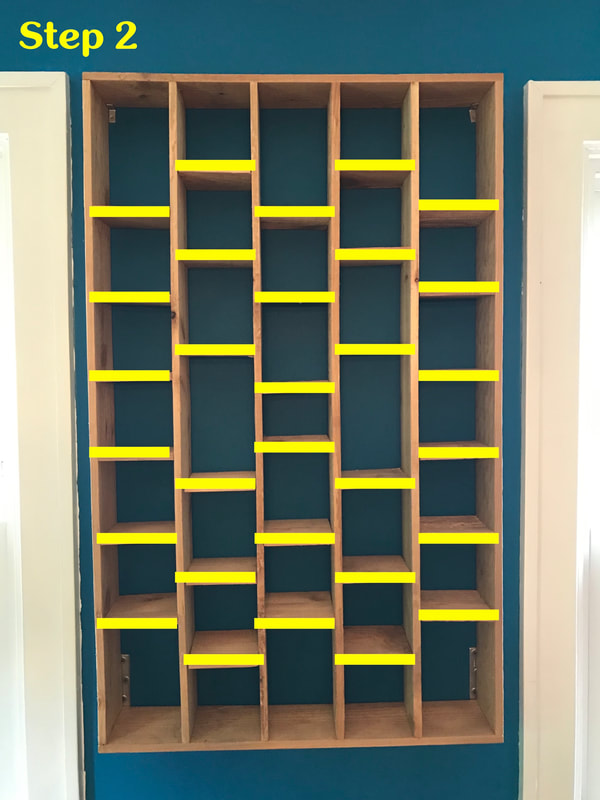
If you are a handmade pottery collector like me, I run out of cabinet space quickly as my collection grows. As my wife and I outgrew our kitchen cabinets, we thought of ways to display our selection of handmade cups and mugs that would require less effort than ripping out our cabinets and replacing them with an open shelving concept.

Another thing about me that you may or may not know, I am a cheap ass. I'm not looking to spend $200+ on a cool shelving display that isn't just some cookie cutter laminate shelving unit or adding a few horizontal shelves to the wall. A boring shelving unit can cheapen the contents inside it, so I decided to use my planning, design, and woodworking skills to come up with something that didn't cost too much. The result is the image you see above that holds 35 pieces of varying sizes and shapes to make one hell of an interesting wall piece!

I'm going to walk you through the materials, tools, and steps required to make this same mug shelf so you can display your handmade collection inside it's own work of art. If you are a maker yourself, I don't have to tell you how much more you appreciate something when you put the planning, time, and struggle into building something yourself. Let's get to it!
Materials:
All materials needed can be purchased at your local Lowe's, Home Depot, or similar hardware store.
  • Eight 6 ft Cedar Wood Fence Pickets ~$2.75 each (should only need 7)
  • 1-5/8 inch Interior Wood Screws ~$6.50 for 1 lb. box (optional)
If you plan to mount the shelving unit, you will also need the following:
  • Two 5 inch Steel Zinc-Plated Corner Braces ~$3 each
  • Two 1.5 inch Steel Zinc-Plated Corner Braces ~$2.75 for pack of 4
  • Six Wood Screws (1 inch) ~$1 for pack of 18
  • Six Wood Screws (2 inches) ~$6 for pack of 25
  • Twelve 1/2 inch Washers ~$1.25 for pack of 25
Recommended tools:
  • Electric drill with Phillips head bit
  • Nail gun (with minimum 1 1/2" nails)
  • Air Compressor
  • Chop saw
  • Drill bit index
  • Tape measure
  • Square (optional)
  • Lots of patience
​Note: I do not own all of these tools personally. Luckily, my father-in-law has a pretty extensive workshop and provide me access to his saw, nail gun, & air compressor. Find a family member or friend that may have access to these tools and see if you can either borrow them or rent them for a short time. Lowe's or Home Depot may rent out similar equipment also.
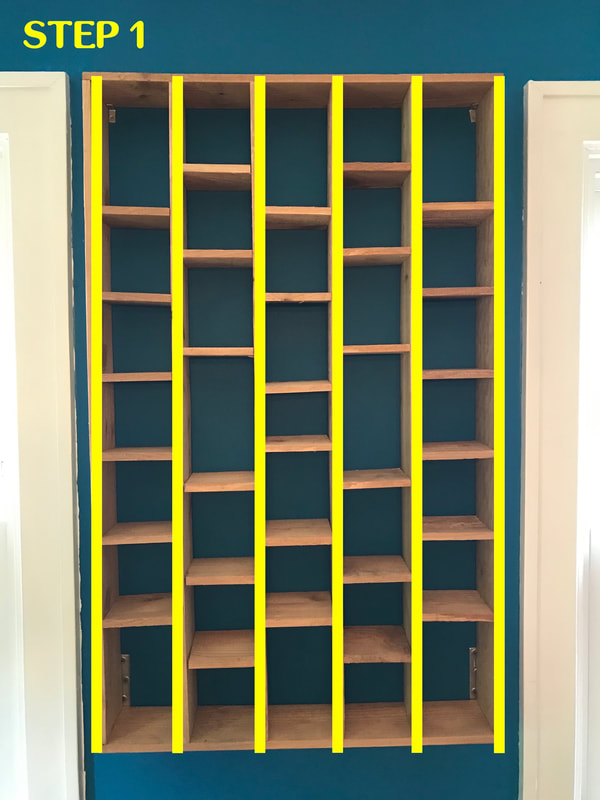
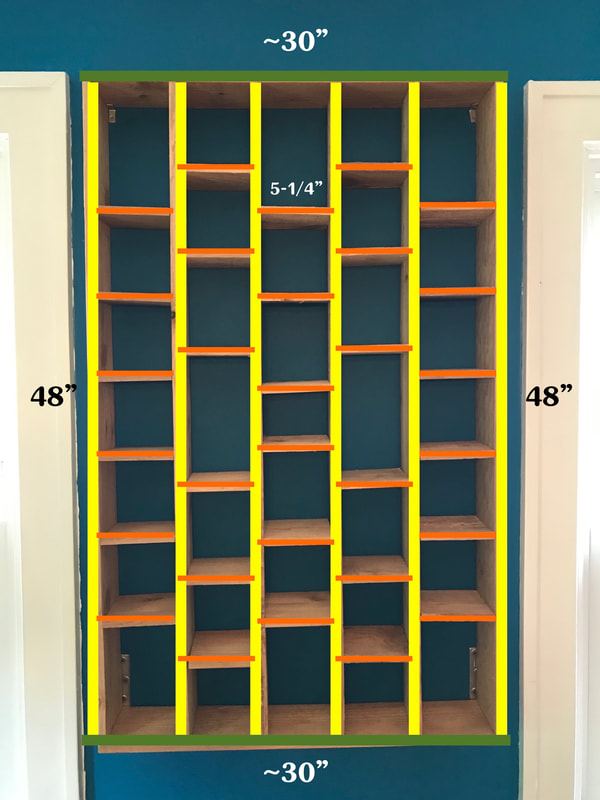
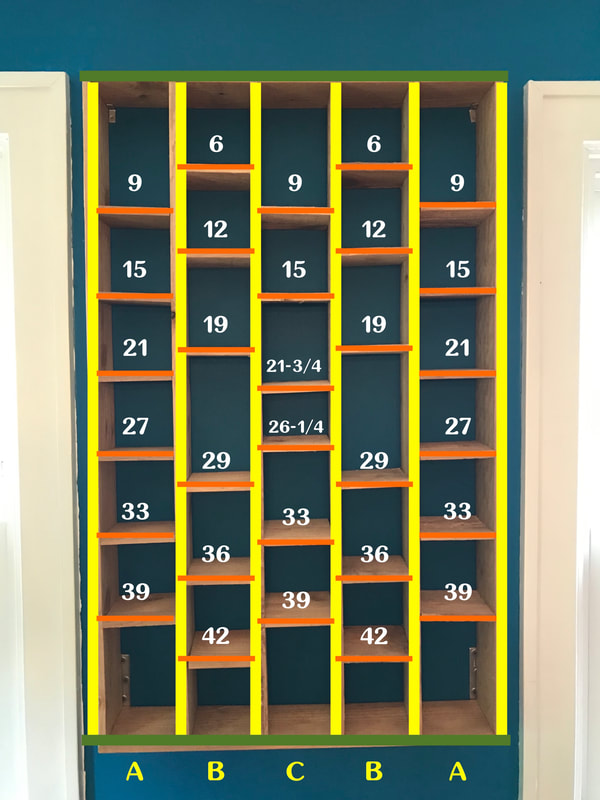
Steps to Build:
There are a few ways you can build this unit. The process I walk through below is not the exact same steps I took when building this unit myself. This process was adapted from the larger shelving unit I just completed that was double the size of the one I'm showing here and I think it should be easier for you to get more precise and square shelves overall than the steps I did my first time.
1. Cut 6 pickets measured at 48" long with chop saw
2. Cut 30 pickets measured at 5-1/8" long with chop saw using remaining wood from Step 1. Use additional picket afterwards if necessary.
Pro Tip: I would recommend measuring & cutting them one at a time. I found inconsistencies if I laid out the measurements on one long board and cut all of them afterwards. The saw blade is going to remove a fraction of your measurement with each cut and each one you cut will be a little shorter than the last one. Cutting them one at a time will ensure precise measurements across all 30 shelves.
3. Before we start assembling, let's go over how shelf placement is determined for each column. We have 2 pairs of matching columns and 1 central column that is different than the others. I will try to depict this easily by labeling each column with a letter: A, B & C. Columns labeled 'A' will have the small shelves added in the same spots vertically as the other column labeled 'A.'

Step 1
Step 2
Step 3

4.    We are now going to start marking where our horizontal shelves are going between 2 of our vertical pickets. Let's start with column A at the far right. Grab 2 of your 48" pickets and stack them together lengthwise, like a closed hot dog bun. With a tape measure laid across the length of the pickets, make a mark on both pickets at 9", 15", 21", 27", 33", & 39". See 'Step 4' image at the right for a better visual. You now have the exact placement where the middle of each shelf will go in that first column.
5.   Now that the column is marked appropriately, let's get that nail gun ready for assembly! It may be beneficial to have some help as you start nailing the small shelves on so you can make sure they stay square and improve your aim as you ideally want to hit the nail right in the middle of the small shelf you are attaching. Begin by positioning the small shelf perpendicular to your long board with the middle of your shelf even with a mark you made in Step 4. Put 2 nails (each about 1 inch from the edge of your picket) to attach your first shelf. Continue for the other 5 shelves. See 'Step 5' image at the right to see what your end result should be.
6.   Grab the second 48" picket you previously added marks to in Step 4 and match the marks with your shelves you just attached. They should match perfectly with the middle of your shelves if you nailed them in at 90 degrees. Now, let's put 2 nails in each shelf to secure it to the second long board and you will have your first column finished.
7.   With one column complete, let's grab another 48" picket and butt it up against one side of your finished column and mark the next shelves to be nailed in. The next column is labeled "B" from our 'Step 3' image above. The marks for that column should be made at the following places: 6", 12", 19", 29", 36", & 42". If you notice, the marks should fall between the shelves of your finished column of shelves. By staggering them, you will be able to nail in the future shelves easily (and it adds more movement/interest to your shelving unit as a whole). See 'Step 7' image at the right for those measurements visually.

Step 4
Step 5
Step 7
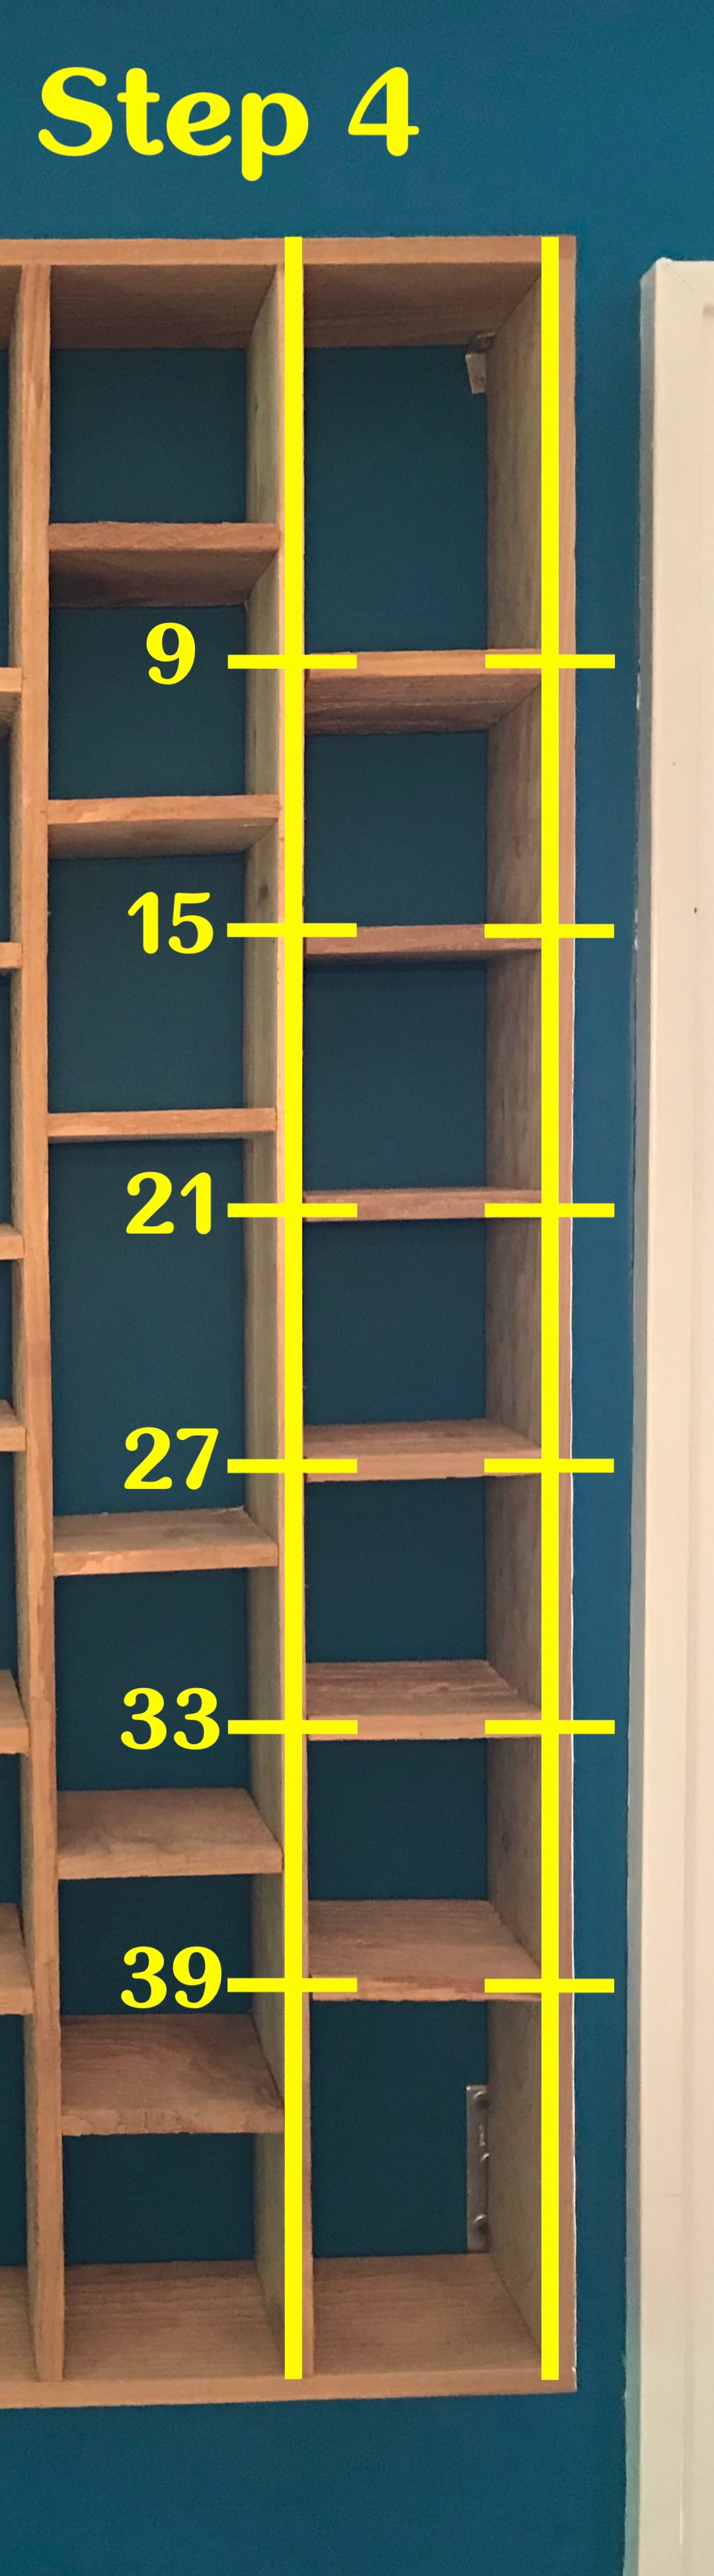
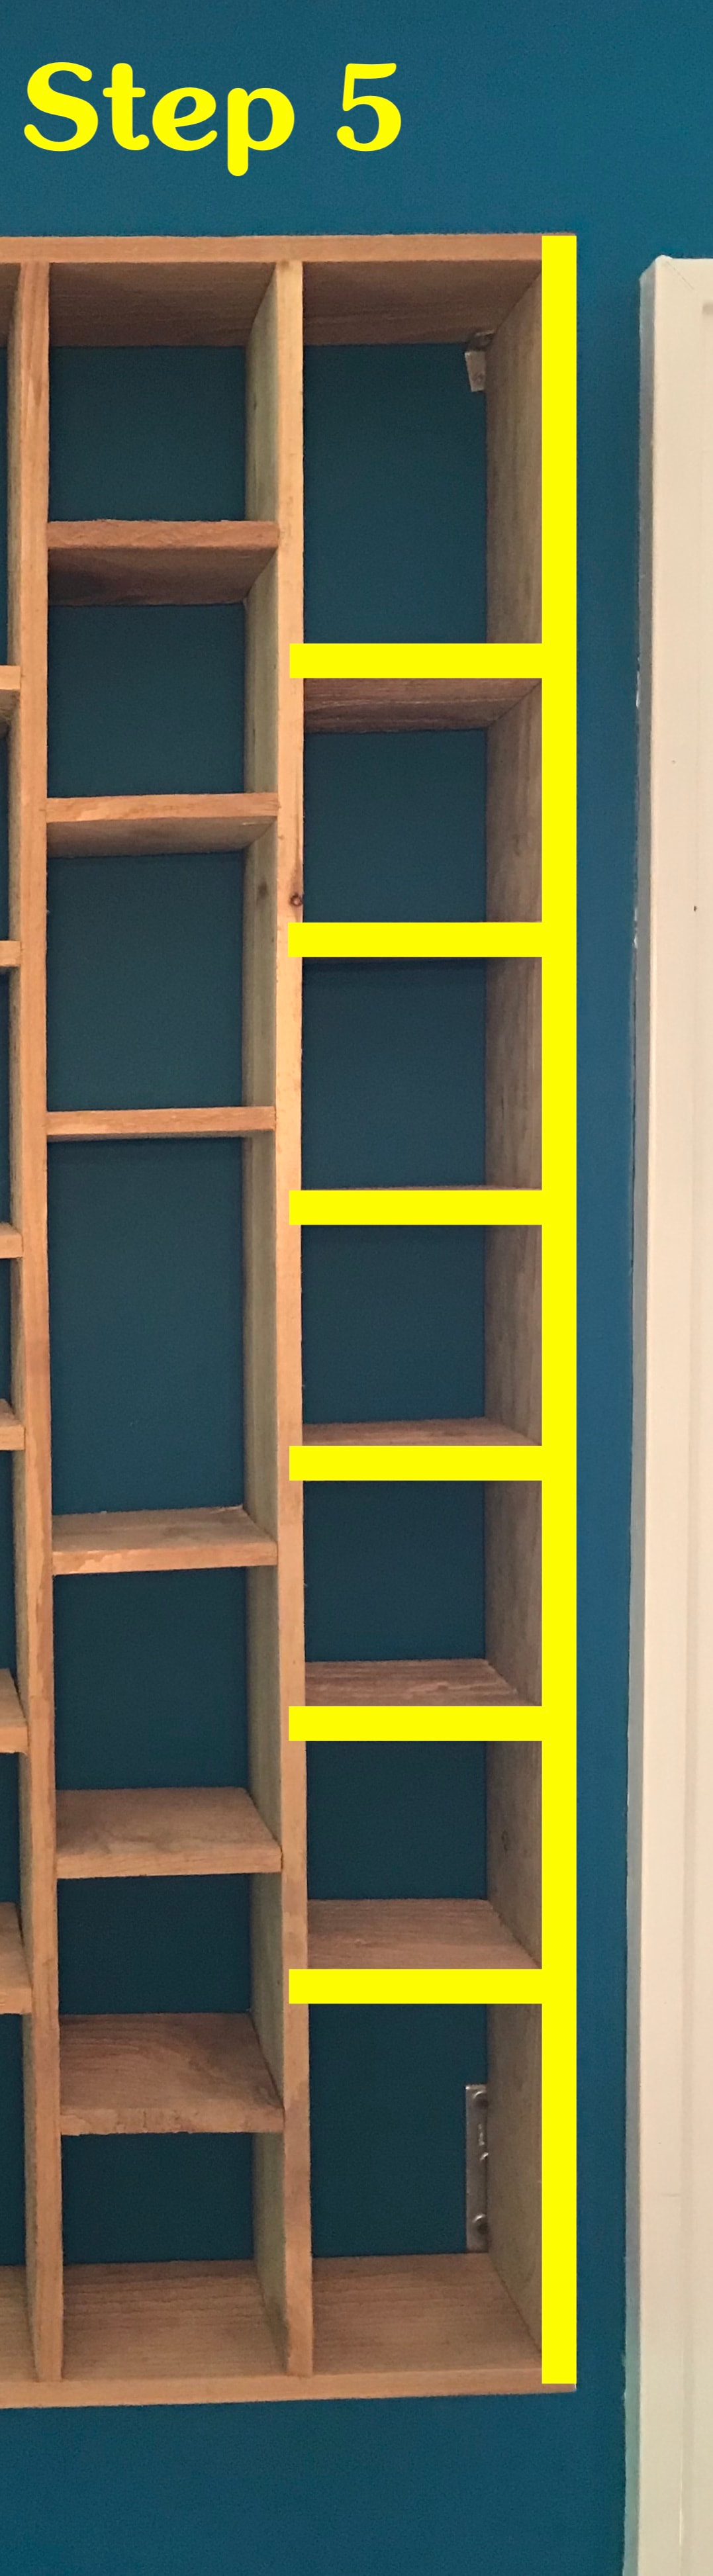
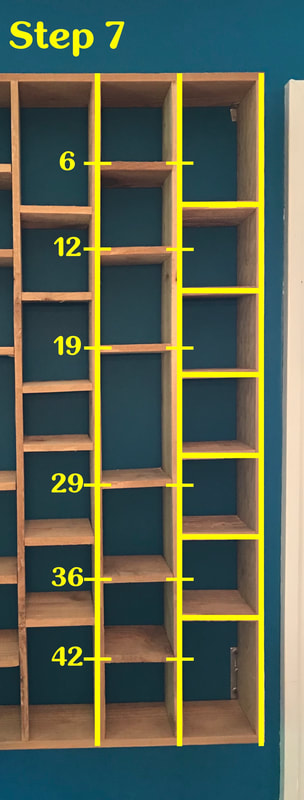
8.    The next steps are basically repeating Steps 5-7 above until you get each column attached to the previous one. You should be able to nail each shelf in place by positioning the nail gun inside the adjacent column's cubbies and shooting a nail about 1 inch from the edge of the vertical board. This takes some practice, but be patient.
9.   The last column to attach is column C before you will do the same measurements as you did in the previous 2 columns. Column C measurements are as follows: 9", 15", 21-3/4", 26-1/4", 33", & 39". You can see this column is very similar to the measurements for column A, but I wanted the middle one to be a little different than the others just for fun & 
aesthetics.
10.  Once you have all of your columns nailed together, the last thing you need to do is cut & attach the top and bottom of your shelving unit. If everything is square and consistent, the measurement from your left edge to the outside right edge should match on both the top and bottom. Make a note of the width and mark it on one of your uncut pickets. It should be about 30" wide. Cut the first one, then measure, mark and cut the second one. Nail those onto each vertical column with 2-3 nails each. You can optionally use the 1-5/8" wood screws when securing the top and bottom if you'd like it a bit stronger, especially at the 4 corners of the unit.
11.   You are done! See the image/PDF below for all the specifics if you would like to save or print it when you build your own.
Shelving Board Measurements
Shelf Spacing Measurements

Words of Wisdom:
  • I choose to use cedar because it is a more sturdy and less chance of knots or warping. It costs a little more than the cheapest option at Lowe's (pine), but I think it's worth it; plus it smells good. :)
  • When selecting your cedar pickets, hold it near your face so you can 'eyeball it' down the picket lengthwise to make sure it is straight and not bowed or warped. It's tough to keep your shelves precise and square if your boards aren't straight.
  • Measure twice and cut once. This is a pretty obvious one, but shouldn't be forgotten. You will probably have enough extra wood left over, but you want to make sure all of your boards are cut evenly.
  • Adjustments to the cubbies can be made based on the sizes of mugs/cups you have. Just keep in mind that keeping adjacent shelves staggered will be the best way to allow you to get a nail gun in to secure them in place.
  • Be patient. I was not the best at using a nail gun right out of the gate at first. You will get used to it the more nails you shoot and accuracy will improve over time.

Thanks so much for following along and I hope you feel empowered to build one for yourself now! If you do build one, please share it with me on Instagram @rdceramics. I can't wait to see your results! If you would like a PDF of the two images above, download them below. I may compose the steps above, including images, into a PDF in the future if you'd like. I'd love to hear any feedback you may have or ideas you would like some insight on for future blogs.
View the PDF
Mug Shelving Guide & Measurements
File Size: 26957 kb
File Type: pdf
Download File

Comments

    Ryan Durbin

    My thoughts and findings while I grow as a maker, small business owner, and artist.

    Archives

    March 2025
    July 2022
    February 2022
    June 2020
    May 2019

    Categories

    All
    Behind The Scenes
    Business
    Ceramic Mugs
    Cheap
    Clay Con West
    Cocktail Recipes
    Conference
    Cups
    Diy
    Do It Yourself
    Drinkware
    Food & Drink
    Handmade
    Handmade Ceramics
    Handmade Pottery
    Home
    Home Bartending
    Kiln
    Mugs
    Newsletter
    Oil Bottles
    Pottery And Drinks
    Process
    Shelving
    Slip
    Small Batch Ceramics
    Studio
    Technique
    Tiki Cocktails
    Tiki Culture
    Tiki Tuesday
    Underglaze
    Wheel Talk Podcast
    Woodworking

Proudly powered by Weebly
  • Home
  • Shop
    • Wholesale
  • Events
  • Classes
  • About
    • Wheel Talk Podcast
    • Products I Use
    • Blog
  • Contact